Thinking about deleting your Facebook account? You’re not alone. Many users are stepping away from the platform for reasons like protecting their privacy, limiting screen time, or simply feeling unsatisfied with how it fits into their lives. Other users are upset over the fact-checkers being replaced by community notes.
However, deleting your Facebook account is a big decision, and it’s important to fully understand what’s involved before you take the plunge. This how to delete Facebook guide will walk you through the process step by step, so you can make an informed choice and take control of your social media space.
Estimated reading time: 14 minutes
Table of Contents
Considerations Before Deleting Your Facebook Account
Deleting your Facebook account is a significant choice that comes with lasting consequences. It’s not as simple as clicking a button and walking away.
To avoid regrets or surprises, you’ll want to weigh your options carefully and prepare ahead of time. Below are the key factors to think about before you delete Facebook from your life.
Checklist Before You Delete Facebook:
- Download your data, photos, videos, messages, and page insights.
- Export ad reports, custom audiences, leads, and pixel events.
- Transfer page and group ownership, and add backup admins.
- Remove Facebook as a login on apps, stores, and tools. Unlink Instagram, WhatsApp, Business Manager assets, domains, and catalogs.
- Clear payment methods, settle ad balances, and cancel active campaigns.
- Save testimonials, reviews, and key comments. Grab contact info from Messenger and your inbox. Note usernames you may want to reuse.
- Update your website icons, email footers, and social links.
- Post a final notice with where to follow you next.
- Set an auto reply for a short wind down.
- Test access for clients and team after changes.
- Consider a 30 day deactivation to confirm nothing breaks.
Ready to move on, or did this reveal gaps to fix first? Click here to get started with a Facebook deletion.
Temporary Deactivation vs Permanent Deletion of Facebook Account
Do you want to take a break or leave Facebook entirely? Understanding the difference between temporary deactivation and permanent deletion is critical.
Temporary Deactivation: This option allows you to step away without losing your data. Your profile becomes invisible, but Facebook saves all your information. This makes it easy to reactivate your account if you change your mind later or just need time away.
- Permanent Deletion: On the other hand, deleting your account is irreversible. After a short grace period (typically 30 days and can up to 90 days), your profile, posts, photos, and all personal data are permanently erased from Facebook’s servers.
- Once it’s gone, you can’t retrieve anything or reactivate the account.
If you’re still unsure, deactivating your account first can give you time to think without committing to a permanent decision. Instagram does that same thing when you go to delete the IG app.
Data Backup and Downloading Personal Information
Before you delete your Facebook account, make sure to back up all the memories and data you might want to keep. Facebook has a built-in tool for this, making it simple to download everything from photos to private messages.
Here’s how to save your data:
- Go to Settings on your Facebook account.
- Navigate to Your Facebook Information in the left menu.
- Click Download Your Information.
- Choose the categories of data you want to save (e.g., photos, posts, messages). Select dates and file format preferences if needed.
- Click Create File and wait for Facebook to prepare the download.
Once the file is ready, you’ll get a notification to download it. Take your time reviewing it—these backups may include hundreds of photos, years of posts, and conversations with friends and family.
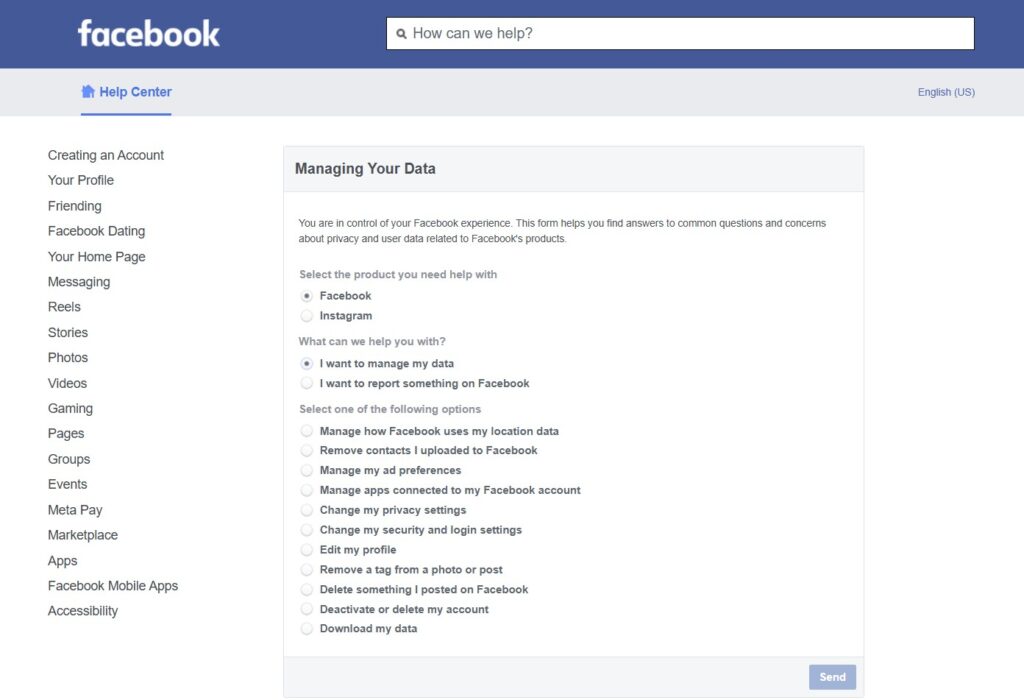
Understanding the Implications of Account Deletion
Deleting your Facebook account doesn’t just erase your profile—it affects everything connected to it. Think about how intertwined Facebook might be with other parts of your online life.
- Connected Apps and Services: Many people use Facebook to log into apps, websites, or services. Once your account is deleted, these connections will be broken, potentially locking you out of accounts unless you update your login information beforehand.
- Loss of Access to Pages and Groups: If you manage any Facebook pages or groups, those will no longer be accessible unless you assign someone else as an admin before deleting your account.
- Grace Period: Facebook provides a grace period (typically 30 days) after you request deletion in case you change your mind. However, once this period ends, the account is permanently gone, and recovery isn’t possible.
It’s essential to plan ahead. Whether it’s saving important photos or updating logins for third-party services, taking these steps now can spare you from unexpected issues later.
Step-by-Step Guide to Permanently Deleting a Facebook Account
Deleting your Facebook account doesn’t have to feel overwhelming, but the process does require a few careful steps. Whether you’re using the desktop version or the mobile app, this guide will walk you through everything you need to know to ensure your account is permanently deleted.
Accessing the Account Settings
The first step to deleting your Facebook account is accessing the settings menu where the account deletion option is located. It may sound simple, but the exact path differs slightly depending on whether you’re on a desktop browser or the Facebook mobile app.
I always recommend using your desktop for changing any Facebook settings and updating privacy, etc. It always works better on desktop than on the mobile app.
- On Desktop:
- Log into your Facebook account through a web browser.
- In the top-right corner of the screen, click on your profile picture or the small downward-facing arrow.
- From the dropdown menu, select Settings & Privacy, then click Settings.
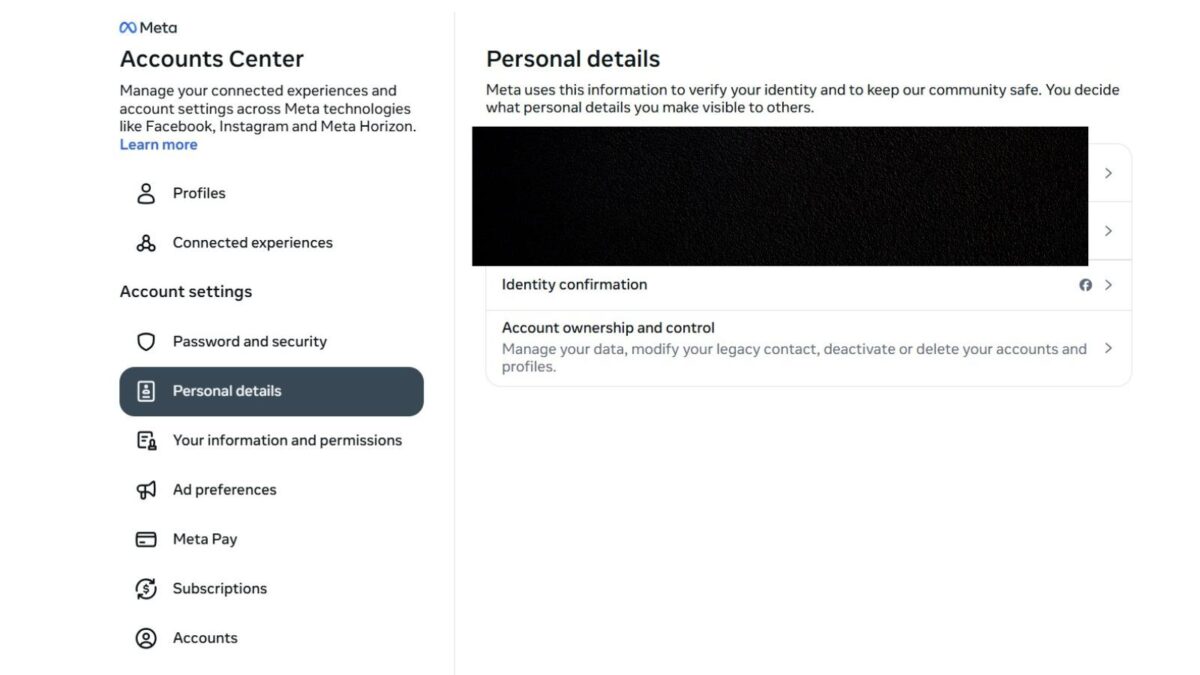
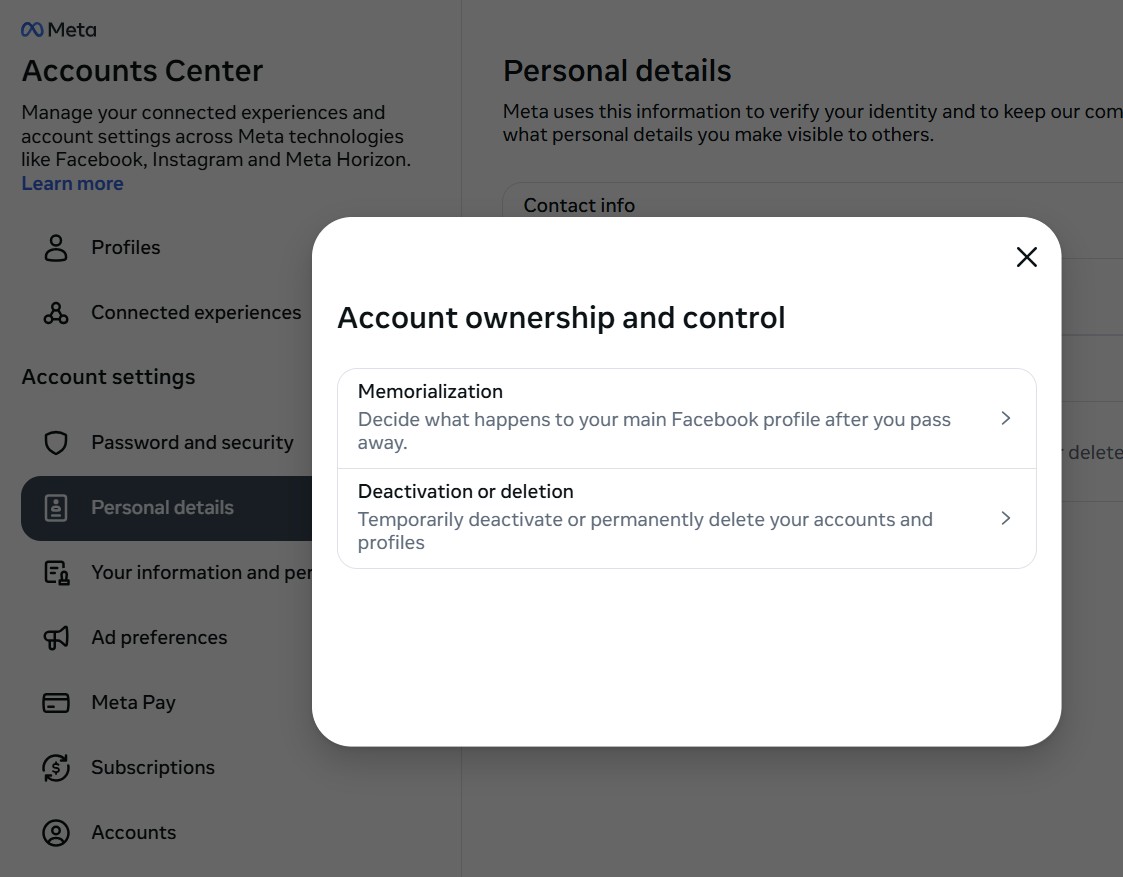
After you click “account ownership and control” you should see this:
- On Mobile:
- Open the Facebook app on your phone and log in.
- Tap the three horizontal lines (often referred to as the hamburger menu), typically located at the bottom right on iOS or top right on Android.
- Scroll down to find Settings & Privacy, then tap Settings.
- Then go to “see more in accounts center.)
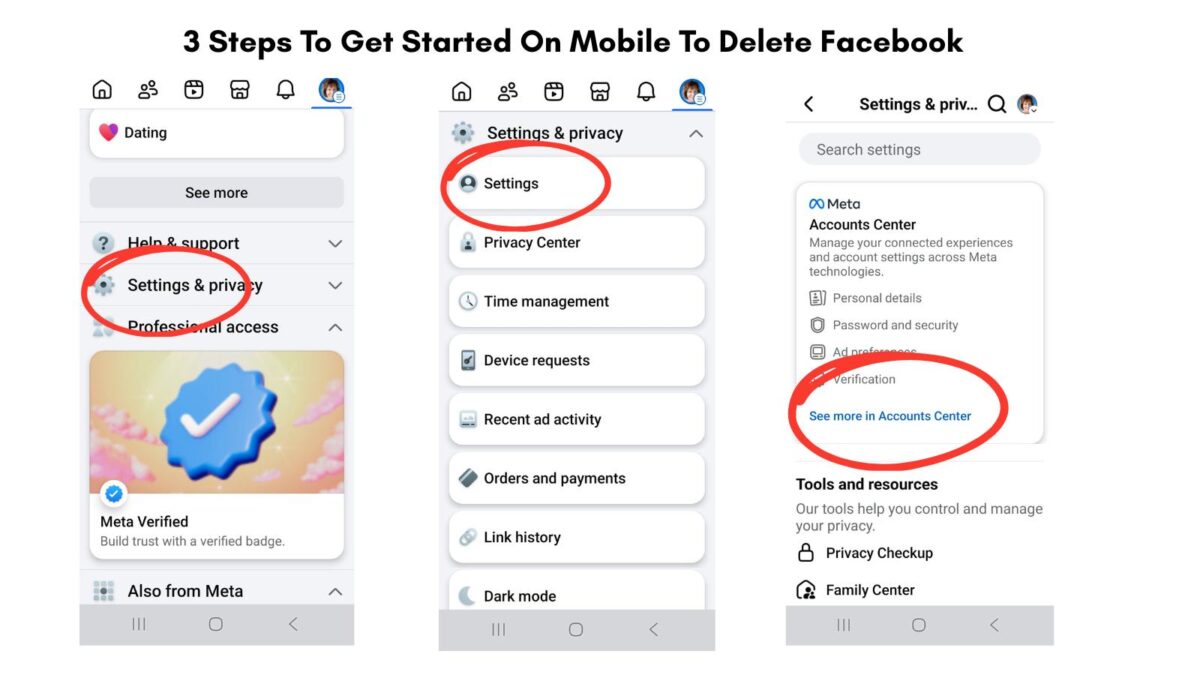
This initial step ensures you’re in the right menu to start the account deletion process.
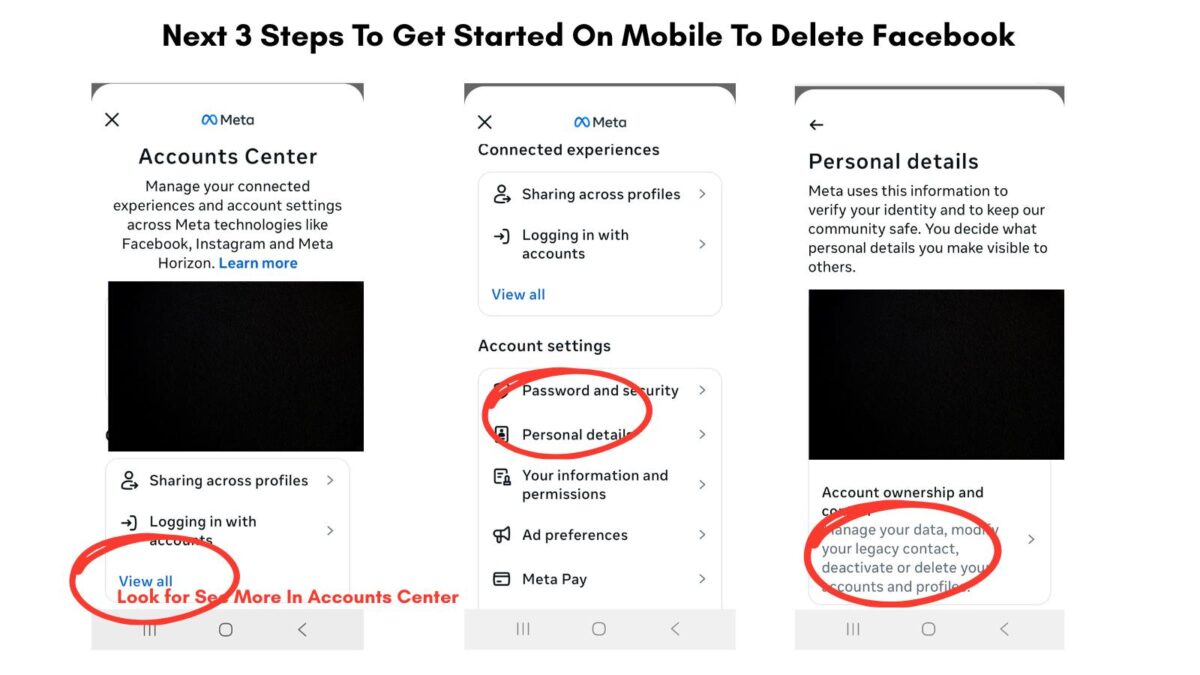
Navigating to the ‘Delete Account’ Option
Once you’ve accessed the settings, the next step is to locate the proper menu for account ownership and control. Facebook doesn’t place the deletion option front and center, so you’ll need to navigate through a few sections.
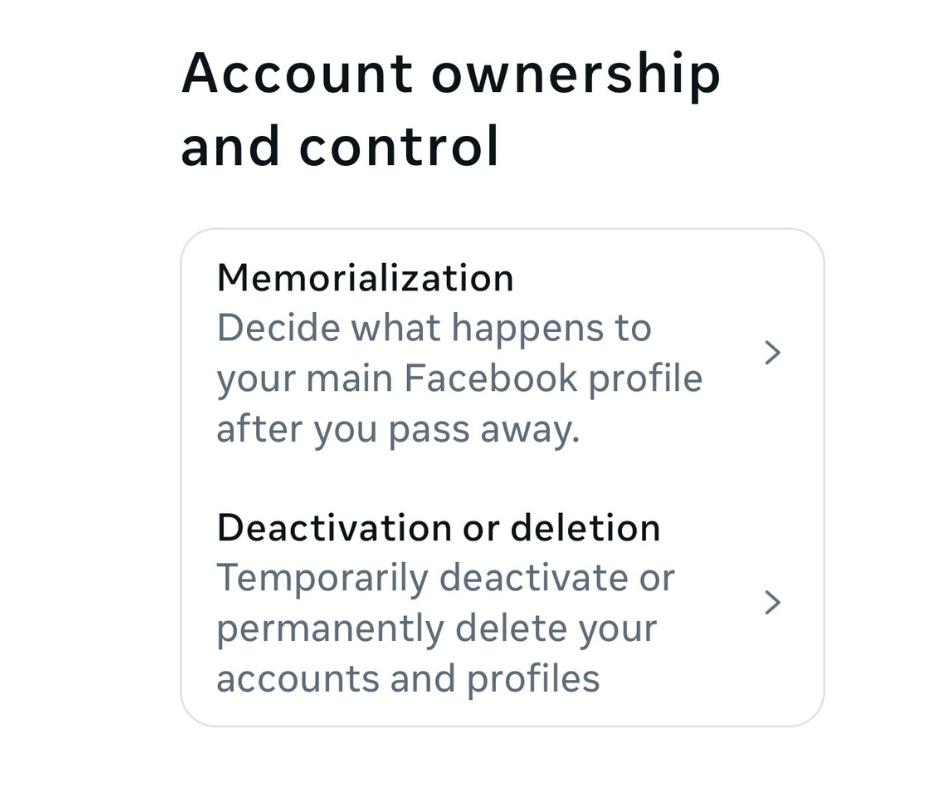
- In the Settings menu, look for the Your Facebook Information section. This is where you can manage your data, download information, and find options related to deactivating or deleting your account.
- Click or tap on Account Ownership and Control.
- Within this menu, you’ll find two choices: Deactivation and Deletion. Select this option to proceed.
- From here, choose Delete Account, then click Continue to Account Deletion.
By this point, you’re just a few clicks away from making your final decision.
Submitting the Deletion Request
Once you’ve selected the Delete Account option, Facebook will prompt you to confirm your decision and provide additional security measures. Here’s what you’ll need to do:
- Review the information Facebook displays, which typically includes reminders about the 30-day grace period and the option to download any data you haven’t already saved.
- Enter your Facebook account password when prompted. This step is required to verify that the deletion request is coming from you.
- Click Delete Account to finalize your request.
At this point, the deletion request is submitted, and your account enters a waiting period before it is actually removed.
Understanding the 30-Day Grace Period
Facebook (and instagram) gives users a 30-day window to change their minds after submitting a deletion request. Think of this as a safety net in case you have second thoughts or realize you forgot to download important data.
During this period:
- Your account and all its content will be invisible to others, as if it has been deactivated.
- You can cancel the request simply by logging back into the account using your email and password.
- If you take no action during the grace period, the deletion process will move forward, and your account will be permanently removed after 30 days.
It’s worth keeping in mind that once the grace period ends, there’s no way to restore your account or its content. So if you’re still unsure, this window provides a chance to reflect before fully committing.
By following these steps, you’ll have complete control over your Facebook account, whether you proceed with permanent deletion or decide to keep it active.
How To Delete Facebook Account From Everything
Clearing Facebook App and Activity from Devices
Once you’ve requested to delete your Facebook account from everything, it’s essential to ensure no remnants of Facebook are still lurking on your devices. This not only protects your privacy but also avoids unintentional interactions with the platform during the grace period.
Here’s how you can clean up thoroughly:
- Delete the Facebook App: Remove the app from all your devices. On iOS, hold down the app icon until it jiggles, then tap the “X.” On Android, press and hold, then tap “Uninstall.”
- Clear Browser Extensions: If you’ve added Facebook extensions to your web browser (like link previews or sharing tools), remove them. Go into your browser’s settings, locate the extensions or add-ons tab, and delete anything Facebook-related.
- Clear Cached Data: Browsers and apps often store data locally to make loading faster. Go into your browser’s settings or device storage settings and clear cookies and cache specifically related to Facebook.
- Turn Off Activity Tracking: If you’ve connected apps or websites through Facebook, log into each of them separately and update your logins. Go to settings/privacy and then apps and websites. Remove Facebook as an active login option to protect your data and ensure no further tracking happens.
By tidying up these areas, you ensure Facebook no longer influences your online activities. You may be surprised as I was to see so many apps connected to Facebook.
Some information, like messages you sent to friends, may still be visible to them after you delete your account. Copies of messages you have sent are stored in your friends’ inboxes.
Exploring Alternative Platforms
Feeling disconnected doesn’t have to be part of the experience after leaving Facebook. Luckily, plenty of social platforms can fill the void, offering unique features catered to different needs.
Here are some to consider:
- Instagram: If photo sharing is your thing, Instagram provides a simple, visual-first interface. (Bear in mind it’s owned by Meta, just like Facebook.)
- LinkedIn: Need a professional networking space? LinkedIn focuses on career connections, job opportunities, and industry insights.
- Discord: Ideal for communities and interest groups, this app supports text, voice, and video chat, making it a great Facebook group alternative.
- Reddit: Perfect for niche interests and discussions, Reddit hosts a wide variety of communities based on almost any topic you can imagine.
- Signal or WhatsApp: Both are great options for private messaging and staying in touch with friends or family in a more secure way.
- Telegram: Similar to WhatsApp but with expanded features like large group chats and cloud-based storage.
- X or Bluesky: These are different than Facebook but give you more options for posting and being seen and followed by others before becoming friends. A great place to network.
Each platform has its own strengths, so pick the one that aligns best with your needs. Whether it’s staying professional, joining interest-based groups, or just chatting privately, these other options can help you stay connected.
Staying Connected Without Facebook
One concern many people have when leaving Facebook is losing touch with friends and family. The good news? There are plenty of ways to stay connected, no social media required.
Here’s how you can bridge the gap:
- Keep a Contacts List: Create an updated list of your closest connections (phone numbers, emails, etc.) before deleting your account.
- Group Chats: Tools like WhatsApp or Telegram let you create group chats for ongoing conversations without the noise of a social media feed.
- Email Newsletters: Stay in touch by creating a simple email list for family updates, vacation photos, or event planning.
- Phone Calls and Texts: Sometimes, going old-school is the best option. A quick phone call can feel much more personal than any Facebook post.
- Shared Calendars: Use tools like Google Calendar to coordinate events, birthdays, or catch-up sessions without needing reminders in a Facebook feed.
Leaving Facebook doesn’t have to mean losing the connections that matter most. With a little effort, you might find these methods feel even more meaningful than scrolling your timeline ever did.
How To Cancel your Facebook Deletion
To cancel your Facebook deletion, act within the 30-day period after initiating the process to delete Facebook account. Log back in to your account using the app or web version.
You’ll see a notice indicating that your account is set to be deleted as part of the account deletion process. Click or tap Cancel Deletion, then sign in to confirm the reversal.
If you forgot your password, use the password reset first, then repeat the steps. Once the account recovery window passes, deleting your account leads to permanent account removal, and you can’t restore it.
Some data may take up to 90 days to remove from backups, but others can’t see your profile after day 30. If you wanted a break instead, consider deactivation or deletion options and choose to deactivate your account in Settings rather than delete.
For Pages tied to your profile, check their status after you recover deleted account to reactivate your account fully. Follow the data download steps to save any downloads from your Facebook data copy only if deletion hasn’t finished. Act fast and confirm the cancel to keep access.
Conclusion: How To Delete Facebook Account
Choosing to delete your Facebook account is a big decision, and it’s one that should come with careful thought. By understanding the process, backing up your data, and preparing for the changes, you can make a decision that truly aligns with your personal goals and priorities.
Some people rely on Facebook for family photos and notices. If you don’t want to completely delete your account you can downsize it by going through all your settings and delete unnecessary apps and people.
Have you ever deleted your FB account? I’d love to about your story on the deletion and how you felt afterwards.
FAQs: How To Delete Your Facebook Account – Clear Answers You Can Use
*Deactivation hides your profile, you can come back anytime. You can still use Messenger, and some info may stay visible to friends.
*Deletion is permanent after a short grace period. You lose access to your profile, Messenger, and most stored data.
*Go to Settings and privacy, then Settings.
*Open Your Facebook information, then Deactivation and deletion.
*Choose Delete account, then follow the steps.
*Shortcut link: https://www.facebook.com/help/delete_account
*You have 30 days to cancel after you start deletion.
*Just log in and hit Cancel deletion.
*Facebook deletes most data within 90 days from the start of deletion.
*Backups and logs may take longer to clear.
Source: https://www.facebook.com/help/224562897555674
Yes, and you should if you need a record.
*Go to Settings and privacy, then Settings.
*Open Your Facebook information, then Download your information.
*Choose date range, format (HTML or JSON), and media quality.
*Download link: https://www.facebook.com/dyi This export can include posts, photos, messages, comments, events, groups, and more.
*Pages where you are the only admin will be deleted. Add another admin first if you want the Page to live on.
*Groups need another admin too, or they may be archived or unmanaged.
*Page admin help: https://www.facebook.com/help/135275340210354
*Messenger: you lose access when you delete your Facebook account. Deactivation lets you keep using Messenger.
*Instagram and WhatsApp: separate accounts. They do not get deleted. If you use Facebook to log in, set a standalone login before deletion.
*Messenger help: https://www.facebook.com/help/712481278775545
*Messages you sent stay in your friends’ inboxes.
*Tags and comments you made may become text without a profile link.
*Some activity logs may remain for security and legal reasons, not tied to your name publicly.
Details: https://www.facebook.com/help/356902921173407
es, handle ownership before you delete.
*Transfer Page, pixel, catalog, and domain ownership to another trusted person.
*Move ad account ownership or add a new admin with full control.
*Close or transfer any Business Manager assets you own.
Business help: https://www.facebook.com/business/help/570158723765719
*Try account recovery: https://www.facebook.com/login/identify
*If needed, submit ID to regain access: https://www.facebook.com/help/159096464162185 Once you get back in, start deletion from Settings.
*If recovery fails, you can report a fake or impostor account to Facebook for review.
- Missinglettr Review: Time Saving Smart Social Media Marketing Automation - February 4, 2026
- Social Media Marketing Slip-Ups to Avoid Today (and Fix Fast)Slip-Ups - February 4, 2026
- Rebranding Tips for Rebranding Your Blog (Without Losing Trust or Traffic)to Your Blog - February 3, 2026

