Are you tired of managing a Facebook group that no longer serves your interests? Whether it’s fallen silent or turned into a chaotic space, deleting your Facebook group can feel like a daunting task. But fear not!
In this step-by-step guide, I’ll walk you through the easy process of eliminating that digital clutter in just minutes. Say goodbye to notifications, messy threads, and the pressure of moderating discussions.
With clear instructions and handy tips, you’ll have the knowledge needed to clean up your Facebook presence quickly and efficiently. Ready to take control and free up some space in your online life?
One important note: You do need to be in front of a desktop/laptop as it doesn’t work on mobile devices!
Table of Contents
Understanding Facebook Groups: Purpose and Functionality
Facebook groups are designed to bring people together over shared interests, causes, or activities. They create a space where members can interact, share information, and build communities around common goals.
These groups can be public, private, or secret, allowing for varying levels of privacy and accessibility. Whether it’s a group for hobby enthusiasts, professional networking, or social causes, Facebook groups offer a dynamic platform for connecting and engaging with like-minded individuals.
The functionality of a Facebook group is robust, providing features like discussion threads, event planning, file sharing, and even polls for gathering opinions. Group admins and moderators have the tools to manage memberships, set rules, and moderate discussions to ensure a productive and positive environment.
This level of control helps maintain order and relevance, making groups valuable resources for their members.
However, managing a Facebook group requires a commitment of time and energy. As groups grow, the demands on admins and moderators increase, from approving new members and posts to resolving conflicts and enforcing rules.
While some groups thrive under active management, others may become dormant or chaotic, leading to the decision to delete the group.
Reasons for Deleting a Facebook Group
One common reason for deleting a Facebook group is inactivity. Over time, the enthusiasm that once fueled a group can wane, leading to fewer posts and interactions.
An inactive group can become a digital ghost town, serving no real purpose and cluttering the admin’s online space. Deleting such a group can be a way to declutter and refocus on more active and engaging communities on Facebook or like on X Twitter communities.
Another reason might be the group’s failure to stay on topic or maintain a positive environment. Sometimes, groups can devolve into chaos with off-topic posts, spam, or negative interactions dominating the feed.
Despite the best efforts of admins and moderators, it can become overwhelming to manage, making deletion a practical solution to prevent further issues.
Lastly, personal reasons might drive the decision to delete a group. Changes in personal interests, priorities, or life circumstances can make managing a group less appealing or feasible.
When the group no longer aligns with the admin’s interests or availability, deleting it can be a step towards simplifying one’s digital life and reducing unnecessary responsibilities.
Preparing to Remove Your FB Group
Before you proceed with deleting your Facebook group, it’s important to prepare and ensure that this is the best course of action. One of the first steps is to communicate with your group members. Inform them of your decision and the reasons behind it.
This transparency can help mitigate any negative reactions and provide closure for active members who have invested time in the group.
Next, consider backing up any valuable content that has been shared within the group. This might include important discussions, shared files, or media that you or other members might want to keep.
Downloading this information ensures that nothing valuable is lost in the process of deletion. Facebook does not offer an automated way to back up group content, so this will need to be done manually.
Finally, review the group’s settings and membership list. If your group has multiple admins, it’s crucial to discuss the decision with them and reach a consensus. Removing all members, including other admins, is a necessary step before you can delete the group.
This preparation phase ensures that you’re ready to proceed with the deletion smoothly and without unforeseen complications.Then, jump on your desktop or laptop to begin deleting your Facebook page.
Step-by-Step Instructions To Expunge Your Group
Deleting a Facebook group involves a few straightforward steps. Here’s a detailed guide to help you through the process:
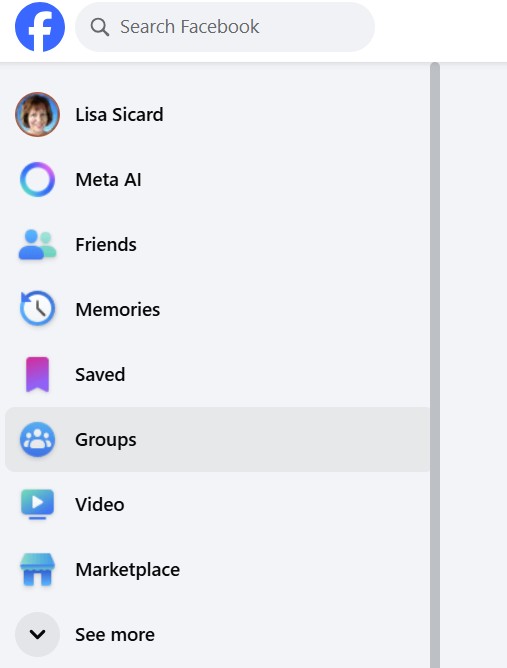
Access the Group: Log in to your Facebook account and navigate to the group you wish to delete. Ensure that you are using a desktop or laptop, as the option to delete a group is not available on the mobile app.
Remove Members: In the group, go to the “Members” section. Here, you will need to remove each member individually. Click on the three dots next to each member’s name and select “Remove from Group.” Repeat this step until all members, except yourself, have been removed.
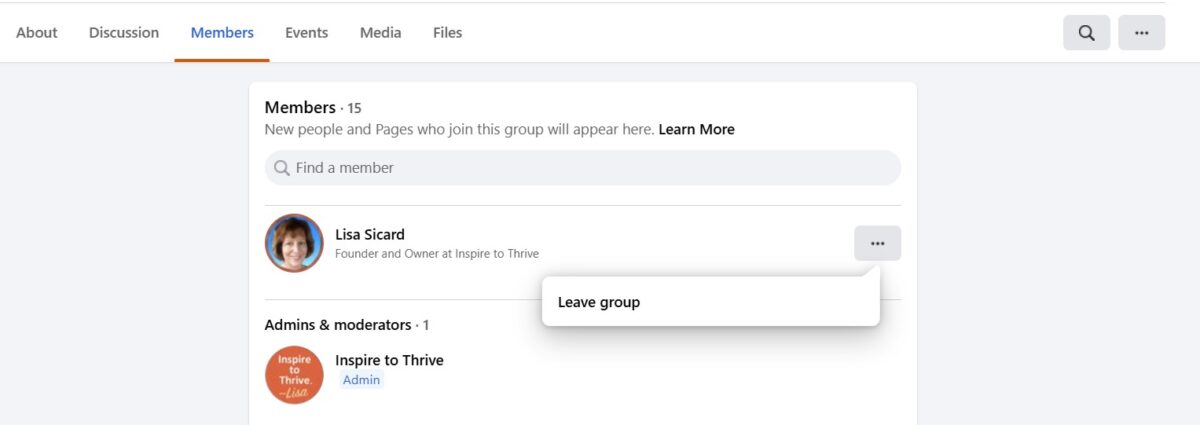
Leave the Group: Once you’re the last remaining member, locate your name in the members list. Click on the three dots next to your name and select “Leave Group.” A prompt will appear asking if you want to delete the group. Confirm that you want to leave and delete the group.
(Since I’m not deleting my group I’m showing how to leave group from another one.) It will look the same for you to leave as you are deleting your group page.

Deleting your group should only take a few minutes if you follow these steps. The group will be permanently removed, and all posts, comments, and files will be deleted.
This action is irreversible, so ensure that this is the desired outcome before proceeding.
What Happens After You Hit Delete?
Once you delete your Facebook group, all content associated with it will be permanently removed. This includes posts, comments, photos, and files shared by members. Members will no longer have access to the group, and it will no longer appear in their groups list.
The deletion is immediate and cannot be undone, so it’s important to be certain of your decision before proceeding.
Members of the group will not receive a notification that the group has been deleted. However, they will notice its absence when they try to access it. If you communicated your plans to delete the group beforehand, members should be aware of the situation and understand why the group is no longer available.
Administrators who have deleted a group may feel a sense of relief from the burden of management. The digital clutter is reduced, and you can focus on more relevant and active groups or other online activities.
The deletion of a group can mark the end of an era and the beginning of a more streamlined and organized Facebook presence.
Alternatives to Removing Your Facebook Group
If you’re hesitant about permanently deleting your Facebook group, there are alternatives to consider. One option is to transfer ownership of the group to another member.
If there are active members who are passionate about the group’s purpose, they might be willing to take over admin duties. This allows the group to continue without your involvement.
Another method is to reduce the group’s activity level without deleting it. You can change the group settings to require admin approval for all posts, reducing the amount of content you need to manage.
Alternatively, you can make a group announcement explaining that the group will be less active or that you are stepping back from active management.
Archiving the group is also an option. This means the group will no longer accept new members or posts, but existing content will remain accessible to current members.
Archiving preserves the group’s history and content while effectively pausing its activity. This can be a good compromise if you want to retain the group’s information without actively managing it.
How to Archive Instead
Archiving a Facebook group is a simple process and serves as a viable alternative to deletion. Here’s how to archive your group:
- Access the Group: Log in to your Facebook account and go to the group you wish to archive. Ensure you are using a desktop or laptop for this process.
- Group Settings: Once in the group, click on “More” under the group’s cover photo and select “Edit Group Settings.”
- Archive Group: Scroll down to the section labeled “Archive Group.” Click on “Archive” and confirm your decision. The group will be archived, meaning it will no longer accept new members or posts.
Archiving a group maintains its content and allows existing members to view past posts and discussions. This option can be particularly useful if the group contains valuable information or memories that members might want to revisit.
Archiving can also be reversed if you decide to reactivate the group in the future.
However do note: You may not have access to these settings if you set up your group from your page as I had 6 years ago. That option is not available.
Tips for Managing Facebook Groups Effectively
Managing a Facebook group effectively can prevent the need for deletion and ensure a positive experience for all members. Here are some tips to help you manage your group successfully:
- Set Clear Rules: Establish clear rules and guidelines for the group. This helps set expectations for behavior and content, making it easier to moderate discussions and maintain order.
- Engage Regularly: Actively engage with your group members by posting regularly, responding to comments, and encouraging discussions. Your involvement can keep the group lively and relevant.
- Delegate Responsibilities: If managing the group becomes overwhelming, consider adding more admins or moderators to share the responsibilities. This can help distribute the workload and ensure the group runs smoothly.
- Monitor Content: Keep an eye on the content being posted in the group. Remove any spam, off-topic posts, or content that violates the group’s rules. Regular monitoring helps maintain the quality of discussions.
- Foster a Positive Environment: Encourage respectful and constructive interactions among members. Address conflicts promptly and fairly to maintain a welcoming and supportive atmosphere.
Effective management can enhance the group experience for all members and reduce the likelihood of issues that might lead to the consideration of deleting the group.
Conclusion: Making the Right Choice for Your Facebook Group
Deciding to delete a Facebook group is a significant decision that requires careful consideration. Whether due to inactivity, chaos, or personal reasons, deleting a group can bring relief and help declutter your digital life.
However, it’s important to weigh the alternatives, such as archiving the group or transferring ownership, before making a final decision.
By following the step-by-step instructions provided in this guide, you can easily and efficiently delete your Facebook group in just minutes. Remember to communicate with your members, back up important content, and review the group’s settings before proceeding.
Understanding what happens after deletion and exploring alternatives can help you make an informed choice.
Ultimately, the goal is to create a more streamlined and manageable online presence. Whether you choose to delete, archive, or transfer ownership, taking control of your Facebook group can lead to a more organized and fulfilling digital experience.
Frequently Asked Questions About Deleting Facebook Groups
A: No, once a Facebook group is deleted, it is permanently removed and cannot be recovered. Ensure that you are certain about your decision before proceeding with the deletion.
A: Members will not receive a notification that the group has been deleted. They will simply notice that the group is no longer available when they try to access it.
A: All content, including posts, comments, photos, and files, will be permanently removed when the group is deleted. It is advisable to back up any important information before proceeding with deletion.
A: No, the option to delete a group is only available on the desktop version of Facebook. You will need to use a computer to complete the deletion process.
A: Yes, you can consider archiving the group, transferring ownership to another member, or reducing the group’s activity level as alternatives to deletion.
- Instagram Story Captions: Boost Your IG Views In 2026 - December 26, 2025
- Best Private Instagram Viewer Apps in 2026 (Tested & Ranked) - December 24, 2025
- 3 Big Reasons The Most Read Blogs Keep Readers Coming Back (In 2026) - December 23, 2025
